BRAVO/A RADIO AND
CD GUIDE
This is information on the
standard radios, the CD players to fit them and where to get them
in the UK.
|
Download the manual for the AD182H
Radio in pdf format here
Big thanks to Pete F for this one
Adobe Acrobat reader required
Click
here
|
|
The only new CD changers
that will directly fit to the Bravo/a head units are the
Grundig MCD-46 and the SONY CDX-T69. If you have a MK1
Bravo/a then the likelyhood is that the cable will already
be in the car. It will run from behind the glovebox to
the boot and will be left dangling in a grey foam casing.
If you have a MK2 Bravo/a, Fiats
saved millions by not installing the cable directly. You
will have to install one yourself .
The CD Changers are available
as a kit for your car from Add-A-Cdchanger in the UK.
They can also supply the cable on its own you need the
Grundig on for an MCD 46 or MCD 36 and is available from
the same people


Email
them here
If you do buy from
them or contact them please tell them that you came from
the Bravo Guide. |
|
|
The
MCD 36, 40 and 46 will fit if you can find one, however
the 10 stacker will only work on the flick of a button on
the first 6 CD's, you then have to tab through for the remaining.
Dont forget the cable available as above. |
|
|
Mark I |
The
cable is already in the boot hanging down from either the
left or right hand side under the parcel shelf supports.
Unwrap it from the grey foam and plug the DIN connector
into your GRUNDIG CD Changer (there is a hint there on which
one to buy!). Screw, stick, bolt or blue tack the unit somewhere
in the boot and that is really about it. How you mount it
is really up to you and your use of the car. |
Mark
II |
As mentioned
before, the MK2 does not have a cable installed. If you
have bought the changer kit from the links above then you
will have everything you need. First, decide where you want
to mount the changer, they will fit under the rear seat
if you want to cut a flap in the carpet, or in the boot
if you want to spend the time getting the cable there! |
There
really isn't an easy way of explaining how to run
the cable, its pretty obvious though. The hardest bit is
to run the cable under the door sill plate. This plate will
more than likely split or crack as you take it off. Don't
worry, new ones are available form Fiat at 12! Try
and run it under the trim and seats as far as possible to
prevent damage and snagging. I would recommend getting a
box of plasters first as the finish on those Fiat plastic
interiors is dreadful and you will cut yourself to shreds
doing this - I did! |
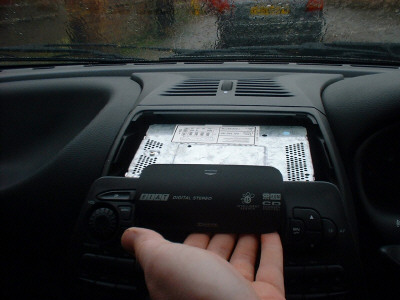
How
to Remove the Standard Radio
|
| 
Open the tape flap |
Slide a feeler gauge down the left hand bottom side |
Pull the tape unit using your fingers inside the
unit |
| 
Slide the feeler guage down the right hand bottom
side while pulling the unit out |

The unit will now just keep pulling out |

It is the bottom of the clip that goes into an indentation
and you are pushing the lug up to release the radio |
Alternatively, you may wish to
use two tools. One in either side. Sometimes after doing
the left side then going to the right, the left clicks
back in place! how frustrating!
|
Fitting
an Aftermarket Radio
|
You
can of course fit any aftermarket head unit into your
Bravo. You will need a fascia moutning plate which can
be purchased from Auto
Audio Accessories.
Jonathon has imported some stylish versions, much better
than the ones found elsewhere, mainly because he
owns a Bravo himself - top lad! |
|
|
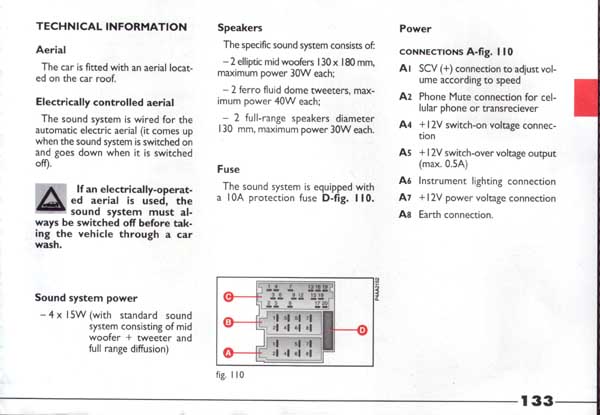
Speaker
Cabling Block |
| Position |
Colour |
Use |
|
1 |
Light Blue / Yellow |
RH Rear Speak + |
|
2 |
Light Blue / White |
RH Rear Speaker - |
|
3 |
Pink / Black |
RH Front Tweeter & Door Speaker + |
|
4 |
Black / Violet |
RH Front Tweeter & Door Speaker - |
|
5 |
Red / Yellow |
LH Front Tweeter & Door Speaker - |
|
6 |
White / Black |
LH Front Tweeter & Door Speaker + |
|
7 |
Light Blue / Red |
LH Rear Speaker + |
|
8 |
White / Red |
LH Rear Speaker - |
|
| Feed and Earthing
Block |
| Position |
Colour |
Use |
|
4 |
Orange |
Feed From Ignition (only on when Ignition is on) |
|
6 |
Yellow / Black |
Radio Lighting Feed |
|
7 |
Red |
Permanent Feed |
|
8 |
Black |
Earth |
|
Grundig
CD Changer Cable Wiring
|
If you want to make
up your own cable, it will cost about 8 for the
components from Maplins. You will need an 8 Pin DIN
type socket and small terminal connectors. Next you
need to take out the blue connector block from the back
of your radio. If it has wires in it already you are
laughing as all you will need to do is connect the wires
from the cable to the relevant wire in your socket.
If no wires are in the blue connecotr then you will
need the terminal connectors to fit.
Anyway.. the cable
is wired as follows
If you number the
pins on the din plug clockwise 1 to 7 with pin 8 being
the middle one the cable is wired as follows
1-2
2-4
3-5
4-8
5-3
6-7
7-6
8-1
The second number
is the corresponding position of the wire in the blue
connector as follows.
Cable also available to buy from
here
|
Fiat
Radio Tips and Hints
|
| Resetting
For Use
The sound system will be electronically protected if the
code is on and the device is disconnected from the car
battery (or the constant 30 positive terminal) |
1. The message >>SAFE<< will appear on the
display after approx 3 seconds the message >>1----<<
will appear. The 1 identifies the number of attempts to
enter the code.
2. Enter the code
by means of the station selection buttons from 2 to 5
eg 1018
Button 2 press once
Button 3 dont touch
Button 4 press once
Button 5 press eight
times
3. To confirm the
CODE: briefly press the EXP button. The message >>SAFE<<
will appear temporarily on the display. The system should
start working after 3 seconds. |
Radio
Wiring Guide |
I think
this applies to most of the 182 range
|
| MCD36 Cartridge |
Lost, Stolen
or Broken MCD 36 or 46 CD Cartridge?
CPC (Combined Precision
Components) 08701 202530 www.cpc.co.uk. They take the
details from you and then send you a enquiry outcome form
with the results. Cost 29.73 + VAT and POSTAGE -
approx 39 quid for a new one.The part number for the MCD
36 is GR75952-038-65. |
|
Click
here for Sven's pdf guide
If you do not fancy attempting
this yourself, try contacting the guys below. They will
probably have a solution for you. They can also supply
custom brackets and kits to fit directly on to your Bravo/a
or Marea
Page Sponsor Harrison McCarthy Kitchens
Combination central heating boilers are particularly efficient whenever measured up to more outdated boiler types. In reality, switching out your Denton Kichens.
with a newer combi central heating boiler may help to save as much as 400 pounds per annum on a family's heating system expenses. Combi central heating boilers are much less complicated than conventional heating systems, which in turn means that systems have a tendency to be more affordable. It is likewise simpler to obtain replacement components in the event that a problem arises.
If you need any assistance on what to order e-mail their sales team who are very helpful
If you do buy from them or contact them please tell them that you came from the Bravo Guide. |
|