THE GUIDE TO
FIXING A FIAT BRAVO
Welcome to the technical FAQ
on the Fiat Bravo/a. Here are details of issues that occur with
Fiat Bravo's and the general way to either get around it or make
a fix. This is not intended as a full manual and if your mechanical
competence is not sufficient please ask a mechanic to carry out
any work.
If your problem is not listed
here please post a message on the Bravo Forum where advice is freely
given. You will need to state the year of the car and the engine
size and as much detail as you can.
Click
here to go to the forum
FIAT Service Manual here
Frozen Handbrake? Click
here
CD and Radio Guide has moved
to its own page here
|
| Cambelt |
|
Erratic
Idling
Jumping revs from 850
- 2000rpm |
Idle
Air Control Valve
If you tap the idle
air control valve (electro valve) and the revs drop back
that the faulty piece is the smaller of the 2 little cylinders
(2 pin electical connector). Fiat don't sell that
part on it's own so you have to buy complete new unit at
£140.
Or you can try taking
apart the old one and cleaning all the metal pins, especially
near the spring and re-trying it.
(We will try and get a bit more detail on this including
a pic or two to explain this) |
|
Bleeding
the Cooling System on a 1.6
2 bleed screws, 1 on
the rad (top drivers side I think) and 1 on the heater
hose down behind the engine. The hose has a kink in it and
the screw is in
that.
Turn heater on first!
You can't bleed it with the heater off.
open rad bleed screw,
fill rad with water until water comes out of screw.
Replace screw.
Open heater hose bleed
screw, fill rad until water comes out there too.
Replace screw.
Start engine, wait 2
mins.
open heater bleed screw,
rev engine. Water should pour out, if not rev
engine a bit more until water does gush out. replace screw
quickly
If you just get air
or steam then return to the first step.
leave running for a
bit longer, confirm heater is hot.
If you get lots of bubbles
and smoke then the head gasket has had it.
If the heater is cold
then start again from the beginning.
Svens guide can befound here
|
Cleaning
the MAF Sensor
(Thanks Sven) |
Click
here for the pdf document |
Cleaning
the EGR Valve - vacuum
(Thanks Sven) |
Click
here for the pdf document |
Cleaning
the EGR Valve - electric
(Thanks Joske) |
Click
here for the pdf document |
Jumping
Temperature
(Thanks Sven) |
This is more than likely
a dodgy connection within your clocks. A simple tap on the
top of the dashboard usually sorts it out. However, if you
want a better solution than constantly hitting your dashboard
see the attached once again from Sven
Click
here for the pdf document |
Changing the Pollen Filter
(Thanks Sven) |
Svens guide to changing the pollen fileter
Click
here for the pdf document |
|
| Resetting
The ECU
THIS WILL NOT RESET
THE AIR BAG WARNING LIGHT |
This
is the basic reset which will restore the various positions
back to factory setting.
Disconnect the battery
for a minimum of 45 minutes. Simply remove the earth side
(-) and pull to one side.
When you reconnect
the battery and start the car for the first time do NOT
rev then engine for 5 minutes. This allows all the postioning
motors to go back to default. Once the 5 minutes is up you
may stop and restart the car then drive normally.
All the "reset"
does is put the positioners such as the IACV back to factory
setting. The car will then relearn the positions required
for the conditions you put your car under. However if you
drive your car hard from the off after doing this, it will
expect to be driven like that al the time and therefore
may feel a little sluggish unless really pushed. Also, whilst
this relearning is taking place you may experience higher
running costs.
You will not have to
reprogramme any keys afterwards and your radio should not
loose its code either. You will have to alter the time unless
its a H2 where if you put it to an FM station it will pick
up the time automarically. |
|
Battery
If the key code light stays on the 1st thing to check is
the battery condition. |
| Fuel
Injector Light 1
It may not be the injector at fault. |
Temperature Switch
The temperature switch on the injector may be faulty. |
| Fuel Injector Light
2
Plus Misfire |
Dirty Injector
Add Forte Gas System Conditioner and 1/4 fill the tank with
Esso Super Unleaded. Drive hard as possible for a short
distance and it should start to improve. |
| Fuel Injector Light
3
Plus loss of power |
Injector
The likelihood is that one or more of the injectors had
seen its last mile. The best advice we can give on this
is to change them all at the same time otherwise you will
get irregular running. (Unless it the 1.4 as that is single
injector!!)
See
here for pdf guide on injector replacement (Thanks Kenneth)
|
| Injector Problems |
Link
Rather than recreate what someone else has done, this site
explains a lot about the Fiat Bravo Injectors and how to
diagnose failure.
http://www.automotivediagnostics.co.uk/tech/2002_07.html
link currently unavailable |
| Replace
The Fuel Sender Unit |
READ ALL THE WAY
THROUGH FIRST
Obviously get a new unit before
you start! If you go into Fiat give them the serial number
of your suspension turret (ZFA182000 ######) and they should
give you the right one.
1)Open the boot and take out the
boot floor carpet
2)There is a plastic cap with three screws covering the
access hole to the pump / sender unit
3)Undo the screws and remove the cover
4)You now need to take out the fuse for the fuel pump -
Fuse Box B (Dashboard bottom right R/H Drive - behind cover)
fuse number 3A but check your handbook on the Brava
5)Start the car and it should run for a while then splutter
to a halt. I fit doesn't - that the wrong fuse!
6)Check to see if you have a car tyre style valve (Schrader
type) on the fuel rail, if so get a rag and then depress
the centre as if to let a tyre down. This should have then
de-pressurised the fuel system.
7)Now disconnect the battery make sure you have things like
your radio code to hand etc.
8)Find a clean rag, a length of string and a bit of cling
film.
9)Disconnect the fuel line form the top of the pump, cover
the end with cling film, cover with the rag and tie with
the string - don't ask why - just do it!
10)Unplug the wiring connectors from the top of the unit
11)If you have a breather pipe then undo the nut and extract
it or undo the return pipe whichever is on yours
12)You now need to unscrew the large ring nut that holds
it all in place. It is at this point you realise that you
didn't read all the way through to start with and have not
got anything that fits!
13)I strongly suggest that you now take the fag out of your
mouth as you should now be able to withdraw the unit from
the fuel tank
14)Make sure you don't loose the sealing ring if you haven't
got a new one!
Refitting
1)The refit is simply put the new one in make sure that
the sealing ring is in place then tighten the ring nut back
up. There is a mark on the tank that has to be lined up
with the mark on the sender unit.
2)Put all the connectors back on and re-attach the pipes
(take the cling film off first!)
3)Reconnect the battery and replace the fuse.
4)Start the car
That really is about it, not rocket
science but it could be if you get a decent spark! |
Rear
Light Earthing
(Thanks Sven) |
Click
here for the pdf document |
Interior
Bulb and Aerial Base
(Thanks Sven) |
Click
here for the pdf document |
Replacing/Repairing
Stalk Unit
(Thanks Gav H and Sven) |
Click
here for the pdf document (Replace)
Click
here for the pdf document (Repair) |
| Ticking
Rear Wiper |
Connections
1. Check the connection strikes are clean and that the boot
closes properly
2. It may be the motor. These were very cheap on the MK1's
and it may need replacing. |
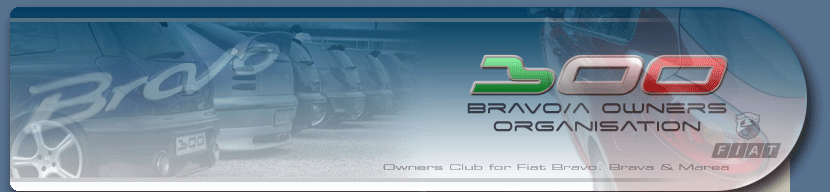
| No Rear Wiper Spray |
Loose Pipe
Most common cause of this is the pipe that carries the water
has come off the pipe at the nozzle. Fiat will charge £30
to fix this as it is not covered by warranty. Take off the
rear panel, re-fix the pipe and secure with glue. See the
picture sequence below. |
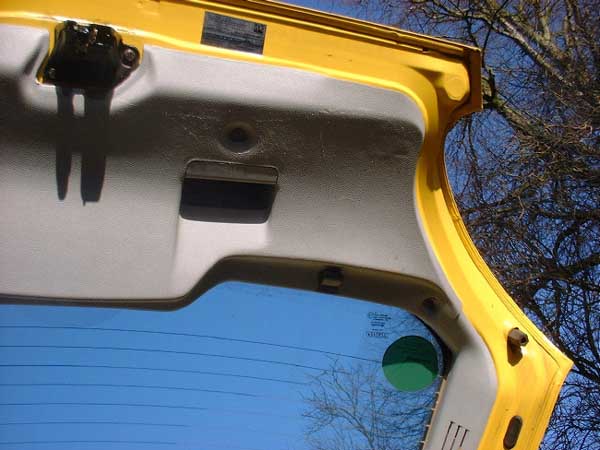
| 
1. Undo the 4 retaining screws |
2. Carefully prize the panel off. The white prong things
are clips, each one of these is in a plastic shroud but
will comeout. |
3. Undo the 10mm wiper blade retaining nut. |

4. Undo the three 5mm Allen bolts that hold the wiper motor. |
|

5. When the unit is free it is obvious where the feed plugs
in... |

6...so plug it in. You can add a little glue to help prevent
it again. |
|
| Creaking
or Cracking on Door Close |
Loose
Bolts
This problem occurs when one or both of the two bolts
that hold the aperture that receives that door strut become
loose. Open the door fully and pull back the rubber/plastic
cover on located at the bottom inside wall of the door
- very easy to do this. Peer into the and you will observe
the bolts. Push a finger in and see if the bolts are loose.
The door strut simply holds the door open at 3/4 or full
opening and stops it flapping about, it is not the hinge
which carries the weight of the door. So although it sounds
very bad, it is not actually that serious. You will need
an Allen key to tighten the bolts, not a spanner. |
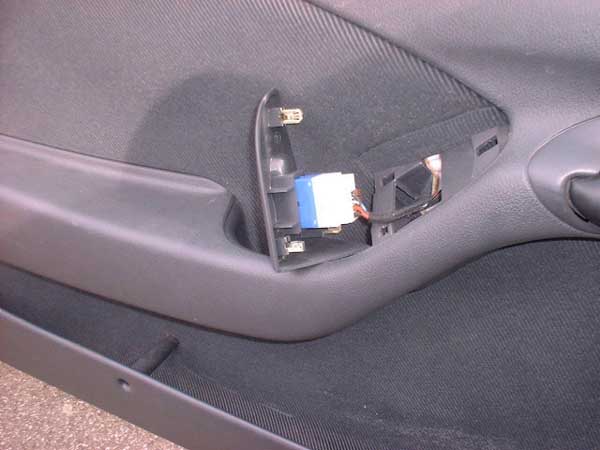
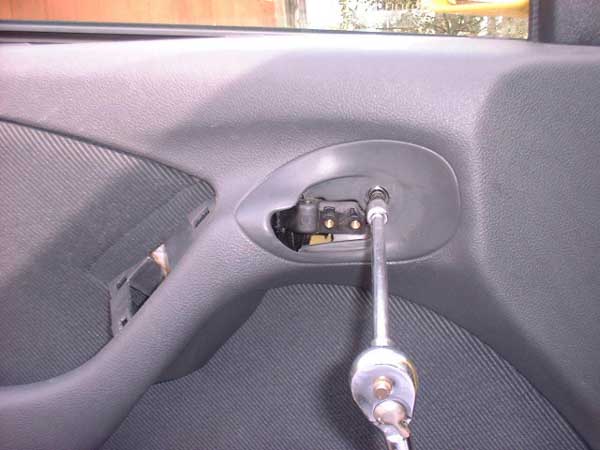
| Door
Handle Replacement |
Click
here for Svens pdf guide
A bit of a process!
1. Remove the inner door panel as described here
2. Undo the screws on the rear edge of the door
3. Undo the nut that secures the handle to the door.
This is done from inside the door using a socket and extension
bar.
4. Carefully twist the door handle then ping off the clips
holding the rods onto the handle using a small flat bladed
screwdriver.
5. The door handle should now be free to come off.
To replace the handle, the operation is reversed but please
check it all works before putting the door panel back
on!
An alternative version
may be found here:-
http://homepage.ntlworld.com/daniel.bhatoa/Fiat/doorhandle.htm |
| Wing
Replacement
My thanks to Alex
McLaren |
Straightforward
but be careful of scratching passenger door.
Remove splash panels
inside BOTH wheel arches to gain access to two 10mm bolts
holding wings to bumper on both sides. Front one a bit
fiddley, I used 1/4 drive ratchet with extension.
Remove both headlights, two 13mm bolts and then pull headlight
towards centre of car to remove ball joint fitting. Judicious
use of a large flat spanner helped here.
Two 13mm bolts, very visible, are undone and then bumper
slides forward and off.
Don't forget to unclip cable on your right hand side,
fixed inside lower part of bumper. I cut through the clip
completely here, and replaced with a cable tie on re assembly!
With careful pulling and juggling pulled the pipe which
feeds bonnet washer jets from washer bottle free of car.
With help, supporting bonnet, at either side undo 4 x
10mm bolts which hold hinge to bonnet and lift bonnet
clear and away from car.
Disconnect bonnet release cable, easy to get at, then
4 x 13mm bolts at either end of top plate which hold it
through the wings.
4 x 10mm bolts hold top panel to air trunking and radiator
top mounting fixtures and then lift off
6mm Allen key required now. Undo the line of allen key
bolts round the edge of wing, one is only accessible by
opening the door and carefully feeding through the gap
created.
2 x 13mm nuts and 2 x 10mm bolts hold the bonnet hinge
in place, remove these.
Using a putty knife (well that is what I used.) from inside
the wheel arch cut away the mastic sealer which 'glue's'
the inner section of the wing to the body of the car and
then carefully lift wing away.
Took about an hour and a half, but I was being ultra careful! |
| Boot
Release
My thanks to Alex
McLaren
Time taken 10 mins
Parts No. and price: 7769751 Striker Plate, £6.23
+ vat = £7.32 Dealer only. |
Replacement
Look at the striker
plate, that's the bit in the body of the vehicle, not
the hatch.
Get someone to pull the boot remote release, and if you
don't see a lever moving then the striker plate requires
renewal to restore operation.
Mark exact location of striker plate, tippex or score
round with sharp tool, then undo 2 x 10mm black domed
nuts.
Lift clear the mechanism, turn it over and unhook the
cable from assembly.
Fit cable onto new mechanism and fit back onto vehicle,
using your marks as a guide.
|
| Roof
Rack |
Thule
The best buy is the Thule component "Rapid"
system.
Foot Pack - 750
Square Bars - 761 (Aero Bars (861)
Fitting Kit - 1059
www.thule.com for more details
As an alternative,
Fapa make some
The cheapest found
were £39.50 + £3.50 P&P.
http://www.roofbox.co.uk/index.html .Hope it helps. |
Mirror
Base Plates
Thanks to Rob M |
Click here
for guide to get rid of the nasty flaking mirror base plates |
Bonnet Pin Replacement
Thanks to Joske |
Click here for a pdf guide on howto replace the failing bonnet catch |
|
| Brake
Pad Replacement
Probably one of the easiest jobs on the Bravo that will
save you money!
Fiat are charging
circa £40 to £48 per hour for labour and will
charge you the full hour to do this with an extra £45
for HGT pads.
Tools required
Jack and Wheel Brace
Flat Bladed Screwdriver
7mm Allen Key
Rubber Mallett
Pliers
Estimated time 25
mins |
New Pads
1 Loosen the wheel nuts and jack the car up. Remove
wheel nuts and wheel. (If you have an alloy wheel that
is stuck then kick the tyre on each side until it comes
off!)
2. There is a spring clip on the outer part of the caliper,
put a cloth over it and prise it off with a screwdriver.
Don't do it any other way as you will run the risk of
either loosing it or hurting yourself.
3. On the back of the caliper are 2 rubber covers with
bungs in the end, one on the top of the caliper one
on the bottom. Prise the caps off with your fingers.
4. Using a 7mm allen key (or bit in a socket drive,
which is easier to work out which way to undo it!) unscrew
the retaining bolts in each one. They unscrew the conventional
anti clockwise direction. These bolts may require a
smack to "crack" the bolt free. You don't
need to remove the bolts completely just enough to pull
them off the caliper.
5. Next, using a screwdriver start the push back of
the piston enough to give a 4 - 8 mm gap. This is done
by putting the flat blade between the outer pad and
the caliper and levering it. The caliper will now easily
pull away from the caliper housing.
6. The outer pad will fall out, the inner pad needs
to be pulled out of the piston as it is held in by a
retaining clip type thingy.
7.Give everything a brush off with an old paint brush
(hold a rag over your nose & month as you do this.)If
you want to be professional use a bit of copper ease
on the bits where the pads come into contact with the
housing.
8.Put the new inner pad into the piston ensuring the
clip goes fully in. Now put the caliper back as if putting
back on. Using either a hammer handle or the tool supplied
by Fiat which is ideal (I am referring to the wheel
brace!) and place it between the outer side of the caliper
and the disc. Gently but firmly pull the outer caliper
away from the disc to return the piston back into the
housing. Now pull the caliper away again and put the
outer pad in the housing. Push the caliper back on and
over the newly installed outer pad.
9. Push the retaining bolts back into place and tighten
them evenly (i.e. do bottom up 1/2 way then top up 1/2
way until fully tightened down)
10. To replace the spring, put the bottom half fully
back into place put the first half of the top part into
the hole then lever the spring bit back over the lip.
Then whack it with a hammer or the palm of your hand
so it sits back in snugly.
11. Replace the wheels and don't forget to tighten the
nuts after returning the car to terra firma.
12. Like I said, dead easy, only 2 bolts and a clip.
When you do it you will find that it is easier than
is written here.
13. Don't forget to run the pads in after fitting them
for at least 100 miles before giving them hell.
Svens
pdf guide can be found here
|
|
Pistons
They screw back in - The tool is available from Halfords
or you can improvise. |
Front
Disc Replacement
Dead easy this -
I did it one morning before going to work!
Tools required
19mm Socket and ratchet
12mm Ring Spanner
Flat Bladed Screwdriver
7mm Allen Key
Rubber Mallett
Jack and Wheel Brace
Pliers
Estimated time 60
mins |
Drastic
Improvements - This was done on a HGT
1. Perform steps
1 to 6 of the pad replacement, but unscrew the caliper
bolts (7mm allen key) all the way and take the caliper
off.
2. Suspend the caliper from the spring with a bit of wire.
3. Now undo the two disc retaining bolts - they are cone
headed and you are probably better off using a 12mm ring
spanner as your socket may not be deep enough. You may
also find it easier to put a screwdriver in the vents
to stop the disc spinning as you do this (or put the car
in gear!)
4. Undo the the caliper housing bracket bolts using a
19mm socket. They are quite tight so be prepared to use
a bit off strength!
5. The disc is now free to come off - after giving it
a whack with a rubber mallett a few times that is!
6. Hold a cloth over your nose and mouth and give everything
a good clean off, especially the hub face where the new
disc is going to fit onto. Also remember to clean the
grease and preservative of the new disc, otherwise this
could contaminate your new pads.
7. Refit is a reverse process, followed by step 8 onwards
of the pad replacement steps. |
Stuck
Handbrake 1 |
Can
you see your breath?
Yup its froze! There is a rubber grommet either missing
or come out of the hole where the handbrake cable goes
in. Although it is tempting to "force it" using
the drive from the front wheels, you will rip the pads
out. Find a local dog and give it a bowl of water.....
The alternative - leave the car in gear and the handbrake
off. |
Hand
Brake Cable Fix
(Thanks Sven) |
Click
here for the pdf document |
Marea
ABS
(Thanks Santtu from Finland) |
Click
here for the pdf document |
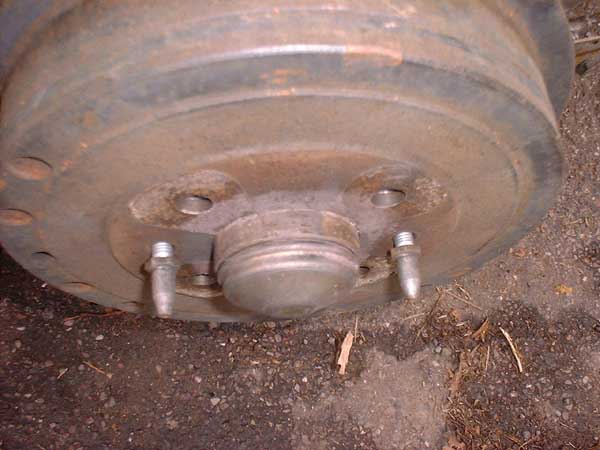
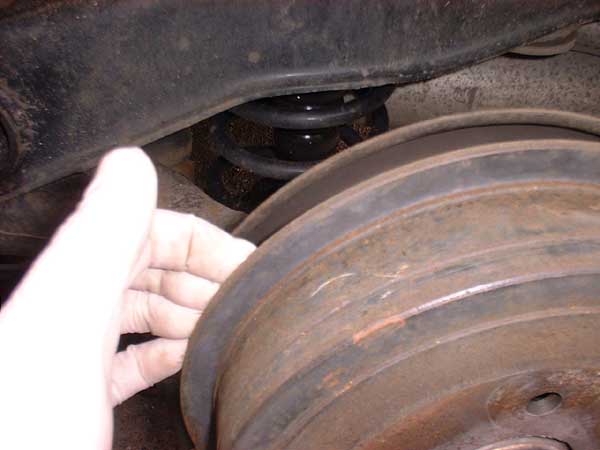
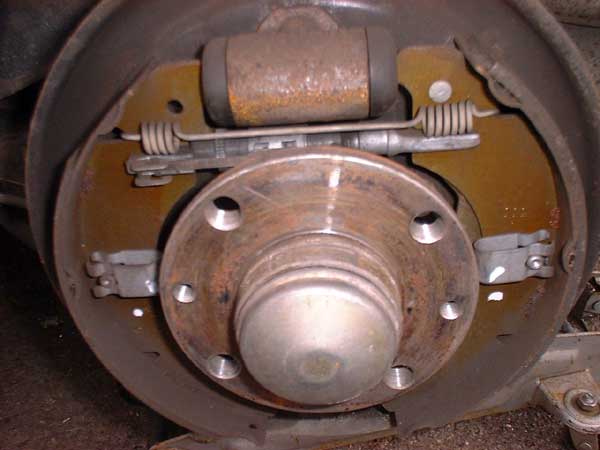
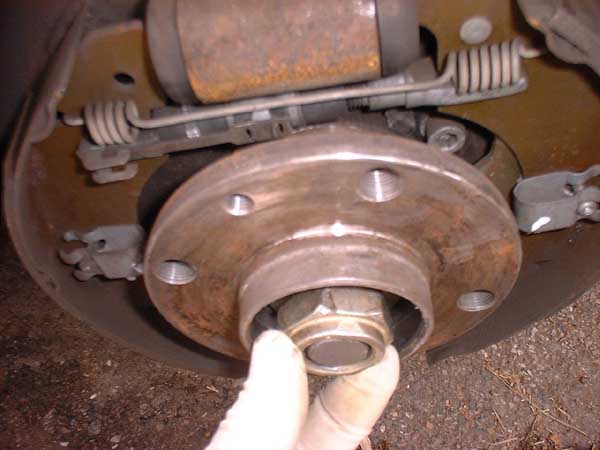
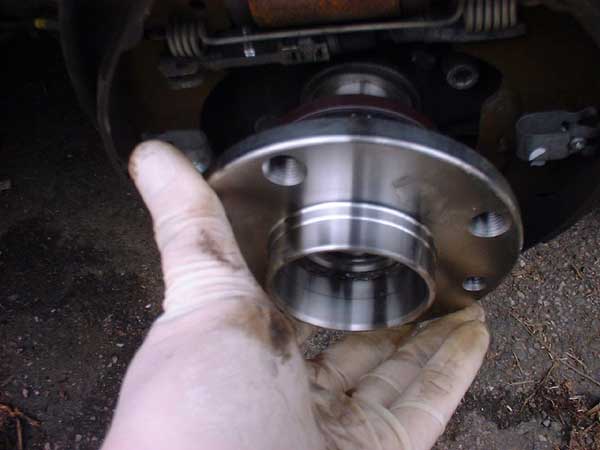
Rear
Wheel Bearing Replacement
When you buy the
hub and bearing (its one piece) make sure that you have
a new hub nut (£1.60) and a 32mm socket!
Tools Required
Jack & Wheel Brace
Axle Stand
12mm Ring Spanner
Flat Blade Screw Driver
32mm Socket & Ratchet
Torque Wrench
Estimated Time 20
mins |
Very
Straight Forward - USE A NEW NUT
1. Jack the car up,
remove the wheel and put onto axle stands - DO NOT attempt
this job on the jack as you will later find out.
2. Take the brake drum off (you may not need to take the
disc off on a HGT) by undoing the two cone headed bolts
with a 12mm ring spanner.
3. If the drum is a bit stuck try gently levering each
side with a screwdriver - then realise you have left the
handbrake on and need to take it off!
4. Prise off the hub cap - I used a long flat screwdriver
to get behind it and tapped it off.
5. You now need to undo the hub nut. This requires a 32mm
socket and is EXTREMELY tight and you need all your strength
to undo it and this is one of the reasons you always do
this job on axle stands as if you are on a jack only you
may come off it.
6. Once the nut is undone - I used a torque wrench and
bar to get it off - the spacer washer should slide off
followed by the hub and bearing.
7. Clean everything up, smear a bit of grease on the new
seals and slide the new hub and bearing back on and put
the spacer washer back on.
8. Now put the NEW hub nut on and tighten to 210lb-ft
- this is why it was so damn tight to start with! My torque
wrench goes to 180 so I just went a bit tighter!
9. Put everything back on in reverse sequence and lower
the car. Job done. |
|
| Rear
Rattle
Yeah right, which one!
If you have an annoying rattle coming from somewhere in
the back of the car that sounds like it could be the suspension
or shocker on the rear passenger side?
|
Seat
Fixing
Fold the back seats down, get some electrical tape,
and wrap it around the passenger side bracket of the rear
seat about three times, now replace the rear seats.
This is due to the bracket being slightly too thin, and
allowing the rear seat to move a bit.
Alternative
Sure Fire Method thanks to Sven
First U need to buy a rubber hose. The hose should be:
inner Ø = 8 mm
outer Ø = min. 10 mm; max. 11 mm
long = min. 80 mm; max. how many times are you going to
cut it wrong ?

Cut the hose across
its length

Now cut the hose in
2 equal parts, 38 mm long
Put them on the bracket,
the cut should face down, to the floor of the car
Get some duck tape and put it
on the hose, but DO NOT circle more then once with the
duck tape. The bracket will be too big.
|
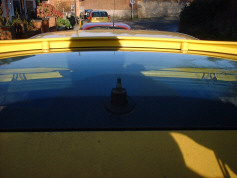
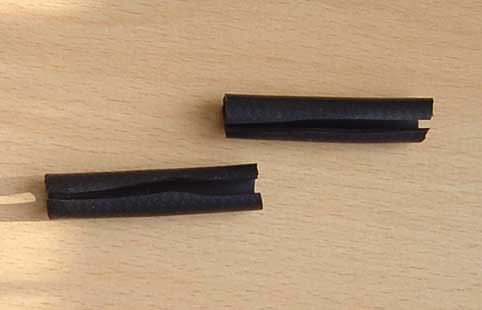
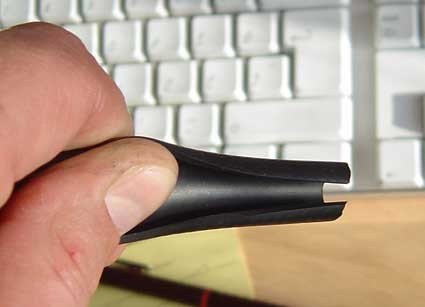
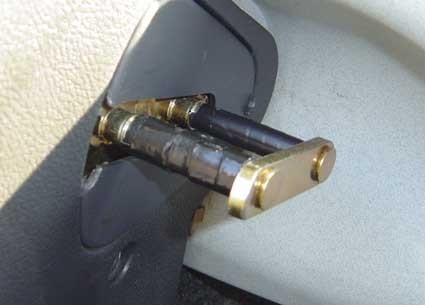
| Water
Leaks 1 |
Aerial
Gasket
The normal cause of leaks into the interior are the gasket
between the roof and the aerial. Most people had made
their own rubber gasket to replace the hard plastic Fiat
one.
1. Remove the interior
light/roof switch housing. Prise out the screw covers
undo the screws and let it drop down.
2. Undo the sunroof motor bolts if you have one and let
it hang down (you could take the wires off if you want!)
3. The arial bolt is under the metal cover that comes
off if you attack it with a screw driver or similar!
4. You can now either tighten it or undo it first and
put some new sealant in.
Refit is the reverse.
Sven's
pdf guide here |
| Water
Leaks 2
|
Drainage
Holes
If the passenger side drainage hole is blocked this will
cause water to ingress into the passenger footwell
on acceleration or if the car is left stationary for some
time. ALWAYS clear drain holes with long cable ties rather
than wire as the latter will scratch the thin paint on
the inner surfaces and is then a major cause of rust.
| 
Under all the leaves and water! |
It is usually this side, but I am not diving in
there at the moment! |
|
| Removing
The Sunroof
If your car is gettig
wet inside and all the other tips havent worked, this
excellent write up from J Moore is the last resort. |
Work
Slowly and Carefully
Removing the headlining
is the first job to tackle. The plastic covers on the
front, middle, and back pillars need to be removed. The
front just pull and pop off. The middle ones have to have
the seat belt holder guide removed before you can unscrew
the single screw and pop it off. The rear pillar is similar,
the seat belt guide holder has to be removed, then the
4 screws holding it on before poping it off. You also
need to remove the sun visors, and grab handles inside.
Popping off the grab handle covers is awkward at first.
With a thin screwdriver you can ease them off. The plastic
covers on the seat belt guide bolt is best removed pushing
up and out from the bottom of the cover.
Then you can undertake the lifting operation carefully.
This will be vital when it comes to the inspection process.
If you are unsure about the lifting angle to use then we
recommend using lifting equipment inspection software to calculte this.
When you have safely lifted this item, then you can carry
on with the rest of the operation in a safe manner.
At the back, the headlining is held with two plastic bungs
to the roof. just pull them out. Of course the interior
light has to be dropped out too. Plus the sunroof motor.
Now its a case of easing the rubber sealing strip back
slightly to free the headlining.
Once its all free, take it out through the boot.
Test the sunroof at this stage, to find out where the
water is coming in. Poured water onto the closed sunroof,
and then look inside the car for evidence.
To take the sunroof out, first open it so that it had
slid to the back out of the way. You need to take off
all the nuts attaching it to the car roof body, and the
4 supporting brackets at the back. Do the ones at the
back last, as this is where the weight is (thats why you
moved the glass back there remember !). Don't forget to
free the drainage pipes off the sunroof. You will need
help now, as the sunroof is heavy, and you need someone
to help support the roof while you undo the last nuts.
With your friend, back the free sunroof out the boot carefully.
Best have some clear place to put it before you take it
out though.
In the factory they seal 4 plastic sections to the metal
sunroof runners. Each of these plastic sections has a
drain point. If they didn't do the work correctly, then
any one of these sections could leak. Clean the joining
edges as best as possible, then used a screwdriver to
"paint" silicon sealant into any joint area
you feel isn't sealed between the plastic and metal.
Then it was a case of re-assembly in reverse. Provided
you didn't move the sunroof glass after taking the motor
out, it will still be aligned when you bolt it back together.
Before putting the headliner back in, wait for the sealant
to totaly dry and then re-test pouring water on the sunroof.
If its still coming in, at least you only have to take
the sun roof out again !
It takes longer to put it all togethed again. The door
seals are a pain, as you have to get the plastic pillar
covers behind the edge of it. Lots of fiddling to do there.
It takes about 1:30 hours to get to the point of releasing
the sunroof. About 2 hours examining and sealing the sunroof,
then about a futher 3 hours getting it all back together
again. A days work really. |
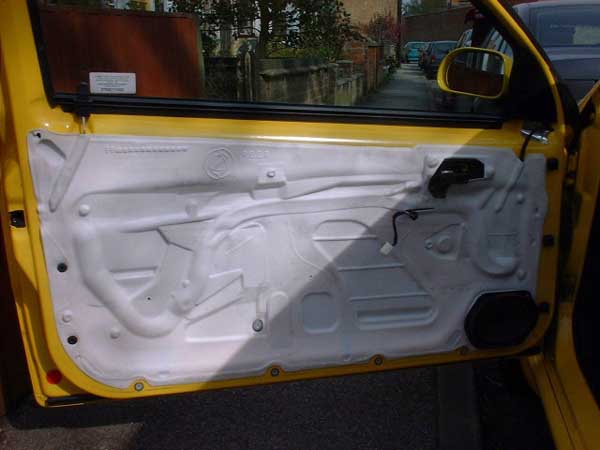
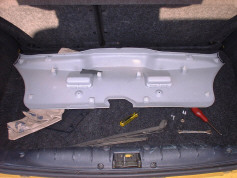
Removing
Door Panels
Tools required
5mm Allen Key
4mm Allen Key
Phillips Screwdriver
Wide Flat Screwdriver
Estimated time 10
mins |
Removal
1. Using a flat wide screwdriver, prize out the electric
window switch, unplug the connector and remove completely.
(pic1)
2. Undo the 2x 4mm allen screws holding the inner door
handle on.
3. Undo the 3x 5mm allen screws (2x in the handle and
1 where the inner door handle was - its under the black
cap) (Pics 2 & 3)
4. Undo the 3 screws by the leading edge and the 4 screws
along the bottom of the panel and the one in the door
tray. (pic4)
5. Slide your hand up the trailing edge, there a three
plastic clips that need to be gently prized out (see pic
5 for their location)
6. The panel then uncips out the window surround by pulling
gently towards you.
You should be left
with a plastic sheet (pic 6). This needs to be carefully
peeled back and away (you may need to take the speaker
off as well). Word of warning here - make sure you put
this sheet back correctly and don't tear it. It forms
part of the seal to prevent water coming into the car
|
| Removing
a Side Window |
1)Put
the window about ½ way down
NOW DO THE SECTION ON REMOVING DOOR
PANELS
2)OK, so far so good. As you look through the opening
you will hopefully see a a white plastic loop. This holds
the clip that holds the glass onto the arm. Pull it down
to release it with a pair of pliers or similar.
3)Either get someone to hold the glass or block it somehow
in the half way up position, the former is the better
if possible.
4)Undo the bolts on the plate and remove it
5)Take out the inner and outer mouldings (rain strips
that prevent the water going down the door!)from the top
part of the door then lower the window (this is why it
was easier with 2 people)
6)You should now be able to pull out the rear moulding
now by pulling it upwards.
7)Tilt the glass forward and then pull it upwards and
outwards.
8)Turn around, trip over your toolbox and drop the glass
- oh no, better not!
Re-Fitting
In the words of good old Mr Haynes, the refit is a reversal
of the removal. Yeah right! Well it is to be honest but
it will take about 5 times longer! Remember to re-fit
that plastic sheet using some new sealant otherwise you
will get a wet door panel. Also, test the operation before
putting the panel back on&ldots;.. |
| Slow
Side Windows - Also how to replace the electric motor
mechanism. |
2 options
Firstly is Toms way (and easiest)
Maplin part N71AN - Silicone spray
with PTFE
Wind the window down
use the straw to spray it into the gap in the rubber strips
around the edge
of the window openning.
Second option
This is easier
with the mechanism removed
1. Remove the door
panel (see above)
2. Take off the inner lining
3. Unclip the window to guide puller clip - its in the
middle of the window and is a bit of a fiddle - it is
a sort of plastic loop, you may need to use some pliers.
4. Unplug the wiring loom to the motor.
5. Undo the three mechanism retaining bolts then wiggle
it about and extract it through the apperture. You can
leave the window in place.
6. Clean off the centre runner with some degreaser and
then regrease using a light grease.
7. You can check the mechanism off the car by simply plugging
it back in. You may also need to regrease the worm behind
the cover.
8. Put it back into the door and bolt it back up.
9. Reclip the window to guide.
10. Spray some silicon based lubricant into the side runners
as well.
Next time I do one
I will take pictures as it is a bit awkward. |
| Faulty
Air Con 1 |
Loose
Connection
The connections sometimes need reminding that they are
there to make contact. A sharp tap on the dash where the
air con temp control is cures this immediately. |
Air Con Self Diagnostic
(Thanks Alex) |
Set temp to “Hi”, position to “Max Def” and speed to “0”. Switch ignition to “Mar” and within 10 seconds, switch fan speed from 0 to Auto to 0 to Auto and back to 0 again. Within a few seconds, “Error Cli” will show in the speedo readout. If everything is fine, it will display “00”. If it shows any other code, there’s a list of what they mean in the Service Manual. If code “00” is display and the air con compressor clutch is not engaging, it’s probably down to the pressure switch reporting low pressure in the system. |
| Sunroof
Blind |
Stuck
"Halfway"
Yup - they do! Known fault and bloody annoying! |
| Draughty
Sunroof
Draughty, noisy etc |
Seal
Likelihood is that the seal needs replacing. Fiat item
at less than £15 normally cures this.
The best way to check
any seal is to use a strip of paper. Close the item (i.e.
door) with the strip placed between the seal and the door.
Then pull the paper. If the paper comes straight out without
any resistance then the seal is not making and adjustment
is necessary or a new seal, dependant on the situation. |
| Headlining
Stains
Little brown dots or patches |
Glue
These are caused by an over use of the glue to stick the
headlining to the roof. If the car is left in the heat
for days on end (i.e. without opening) then this can cause
the glue to seep. Do not use upholstery cleaner as it
is in the fabric and there is little that can be done. |
| Faulty
Speedo |
Cable
A common cause of speedo failures are down to the cable
connector breaking at the gearbox. |
Dash
Bulb Replacement
(Thanks Rab) |
Changing the bulbs
at the rear of the instrument panel is easy but will cost
you for the little "Wheat bulbs"(about 99p)
and some skin off your fingers(keep the plasters handy
for after you've finished.)
To do mine i first lowered the steering colomn ( i know
the manual says remove the steering wheel but that would
make it take longer to do and be even more of a pain in
the arse than it already is.)
Around the inside of the instrument hood there are three
screws (alan key heads) remove them and put the screws
somewhere safe (i use the ash tray).
There are also two more lower down near the steering colomn
(after lowering the colomn they are obvious) take them
out too and put them with the others.
Open the fuse box cover panel next to the drivers door
and look up inside towards the air duct outlet on the
dash (hope that makes sense).
To help you see under there i found it easier after i
lowered the drivers seat right down and pushed it as far
back as it would go then sitting on the seat with your
feet faceing the rear window and your head under the dash.
(you look pretty daft but it worked for me.
Up under the dash on the air duct vent is 1 self tapping
screw with a Philips head undo this (try a small stubby
driver).
To remove the dash panel it will feel as if it's still
screwed to something but it's just really tight it will
be loose on the left but slip something under it to help
leaver the right out a bit (use a cloth to protect the
dash from scratches).
Once it's out and it will take a bit of playing with to
manouver it out of the way of the steering wheel, once
it's out the instrument panel can be pulled towards you
you won't be able to get it out because the steering wheel
is in the way but if you play about with it moving it
towards the wheel and pushing the right hand side of the
panel in and to the right, you can get your hand round
the back to disconnect the cables (multi plugs) i managed
to change the bulbs with only removing one of the plugs
though it would be easier if you take out two.
This gives you more play with the panel and will be able
to turn it round much more.
On the back of the panel you will see the bulb holders
just give them a twist and pull them out.
Change the bulbs and twist them back into the panel.
Re-connect the cables and put everything back the way
you took it out and your dash lights will be back to the
way they should be.
Just take your time and you won't break anything but will
save yourself the cost of having your local thief.....eh
mechanic, from ripping the dash apart with his big thick
oil covered fingers and making a mess of your pride and
joy.
Thanks also to Sven for
this write up here
Click
here for the pdf document |
Seat
Tilt Repair
(Thanks Sven) |
Click
here for the pdf document |
Head
Rest Removal
(Thanks Sven) |
Click
here for the pdf document |
Centre
Dash Removal
(Thanks Sven) |
Click
here for the pdf document |
Heated
Seat Repair
(Thanks Joske) |
A fantastic in depth
guide on how to fit new heating elements to your seats
for extra warmth on your bum for those long winter journeys.
Beware - its a large file. Cheers Joske
Click
here for the pdf document |
Changing the Heater Matrix
(Thanks Sven) |
Please note that this guide usesphotosfrom aEuropean modeland therefore the steering wheel is on the wrong side fir us Brits.
Click
here for the pdf document |
Alarm
(ThanksAlex) |
Interior light unit
Where a factory alarm is fitted, this unit controls the remote central locking and alarm activation. If the key is not working with the system and the red light is flashing on the key, the key has become un-paired. To re-pair the key with the system, you need the 4-digit code of a key that is known to remotely unlock the car (not the code of a new key). The code is available from Fiat for around £25 per code or you can find alternatives to extract the code from the PCB in the key for around £10. Do not replace this unit with a second hand item without the code. New units are unlocked by default and will pair with any key. Key pairing process is in the service manual. Note: if fitting a new unit, read the service manual regarding pairing a key for the first time – even if you already know the process - as after the key is paired, the country code for the alarm must be set.
Remote key
The surface mounted switch on the PCB of the key tends to become loose after a while. To fix, get a cheap soldering iron and just press it on the contacts to re-solder it back to the PCB.
Alarm country code
The process for changing the country code is outlaid in the service manual but if you are changing it because you lights don’t flash or alarm doesn’t chirp on arm/disarm, note that code 5 (UK) causes the alarm to automatically arm itself after 60 seconds which can be very annoying. Set it to code 8 (EU) and it will flash and chirp as it should but not automatically arm. |
|