THE
GUIDE TO MODIFYING A FIAT BRAVO
Welcome
to the Fiat Bravo/a modification guide. This has been slightly
revamped with direct links to the manufacturer's own main web
site wherever possible. In the case where this has not been possible,
I have linked to suppliers who are known to either stock the item
or to be a distributor.
Should you order a part and find it doesn't fit - don't winge
to us, you should check everything out yourself - this is just
a guide to what is available.
For engine tuning see
www.angeltuning.co.uk
Need
some inspiration? Click here for Euro Bravo Gallery
Section
1 - What is available and who makes it |
|
Section
2 - Hints, Tips, Do's and Dont's |
|
|
It
is possible to fit 17" alloys, with a width of
no more than 7.5", straight onto the Bravo without
requiring modifications to the arches. You may
even lower the car by up to 40mm and carry 2 rear passengers
without the tyres rubbing the arches.
Standard
fitment for Bravo/a & Marea wheels is:
PCD 98 - Offest 38 - Centre Bore 58.0
18" alloys will fit with some work. You will,
though, be restricted with regards to your choice of
wheel, as very few manufacturers make 18" wheels
with a width of only 7" . However should you fit
18" wheels, you will not be able to obtain full
lock on the steering and the arches will require rolling,
which costs about £120. If the car has side
skirts, the back of the side skirt beside the rear wheel
will also require trimming as it will catch.
NB. It's easier to fit 18" wheels on a HGT as the
arches are wider.
N.B.
Your speedo will be out if the circumference of your
new tyre is different from that of standard. To calculate
the difference -
click
here
|
| |
You
should now notice that despite the amount of cutting and
sandpapering you have done, your old tyres will not fit
your new wheels. Obviously your local tyre place can help
but we have a few good places to call if you are in the
vicinity. |
|
Springs |
| Make/Drop |
Part
No. |
Bravo |
| Eibach
/ 33 |
1034.140 |
1.2 |
| Eibach
/ 33 |
3016.140 |
1.4, 1.6, 1.8 |
| Eibach
/ 33 |
3017.140 |
2.0, D, TD, JTD |
| Hormann
/ adj |
17182030 |
All (over £1000!) |
| Hormann
/ 35 |
17182031 |
All (check 2.0 and D's) |
| Dalhems
/ 30 |
D3204 |
1.4, 1.6, 1.8 |
| Dalhems
/ 30 |
D3205 |
2.0, D, TD, JTD |
| Spax
/ 40 |
S010002 |
1.4, 1.6, 1.8 |
| Spax
/ 50 |
S010003 |
1.4, 1.6, 1.8 |
| Spax
/ 40 |
S010004 |
2.0, D, TD, JTD |
| Spax
/ 50 |
S010005 |
2.0, D, TD, JTD |
| AVO
/ 35 |
25-020 |
1.4, 1.6, 1.8 |
| AVO
/ 35 |
25-022 |
2.0, D, TD, JTD |
| H&R
/ 30 |
29687-2 |
All (check 2.0 and D's) |
| Novitec
/ 50 |
591HF |
All (check 2.0 and D's) |
| Postert
/ 40 |
FA430004 |
All (check 2.0 and D's) |
Dampers |
| Maker |
Model |
Bravo |
| Boge
(Oil) |
27 T03 F |
All (check 2.0 and D's) |
| Boge
(Gas) |
27 T04 F |
All (check 2.0 and D's) |
| Bilstein
(Gas) |
SE6-8125 |
1.4, 1.6, 1.8 |
| Bilstein
(Gas) |
SE5-8131 |
2.0 |
| Koni
(Gas Adj) |
8741-1351 |
2.0 |
| Koni
(Gas Adj) |
8741-1331 |
1.2, 1.4, 1.6, 1.8 |
| Koni
(Gas) |
8240-1152 |
All (Rear) |
| Spax
(Gas) |
N2166 |
1.4, 1.6 (Rear) |
| Spax
(Gas) |
N2165 |
1.4, 1.6 (Front) |
| Novitec
(Gas Adj) |
594BF |
1.2, 1.4, 1.6, 1.8 |
| Novitec
(Gas Adj) |
596BF |
2.0 |
| Novitec
(Gas Pressure-Adj) |
592BF |
1.2, 1.4, 1.6, 1.8 |
| Novitec
(Gas Pressure-Adj) |
556BF |
2.0 |
| OMP |
AMIS0033AR |
2.0 (Front) |
| OMP |
AMIS0032PR |
2.0 (Rear) |
| OMP |
AMIS0038AR |
1.4, 1.6, 1.8 (Front) |
| OMP |
AMIS0033PR |
1.4, 1.6, 1.8 (Rear) |
Kits |
| Maker |
Model |
Bravo |
| Spax |
V7865 (-40mm) |
1.6, 1.6 |
| Bilstein |
B25112 |
1.4, 1.6, 1.8 |
| Novitec |
593CF (-55mm) |
2.0 |
| Novitec |
590CF (-55mm) |
1.2, 1.4, 1.6, 1.8 |
| OMP |
FI2129 |
2.0, D, TD |
| OMP |
FI2128 |
1.4, 1.6, 1.8 |
Strut
Braces |
| Maker |
Model |
Bravo |
| Hormann |
17182021 |
2.0 |
| OMP |
MA/1732 |
1.4, 1.6 |
Wheel
Spacers |
| Maker
/ Space |
Model |
Bravo |
| Novitec
/ 10mm |
584CF |
All |
| Novitec
/ 15mm |
524CF |
All |
|
| |
Please
note that the rear spoilers / wings listed here do not
need the rear screen drilled. Only the HGT standard
spoiler fits that way.
|
|
|
| Maker |
Model |
Bravo |
| Red
Dot |
XJ16 (6 Slot) |
1.4, 1.6 |
| Red
Dot |
XR16 (20 Slot) |
1.4, 1.6 |
| Red
Dot |
XM16 (40 Slot) |
1.4, 1.6 |
| Red
Dot |
XJ17 (6 Slot) |
1.8, TD |
| Red
Dot |
XR17 (20 Slot) |
1.8, TD |
| Red
Dot |
XM17 (40 Slot) |
1.8, TD |
| Red
Dot |
XJ758 (6 Slot) |
2.0 |
| Red
Dot |
XR758 (20 Slot) |
2.0 |
| Red
Dot |
XM758 (40 Slot) |
2.0 |
| Tarox
G88 |
0701 |
1.4, 1.6, D's |
| Tarox
G88 |
0751 |
1.6, 1.8. TD |
| Tarox
G88 |
0774 |
2.0 |
| Hormann
PG |
18188500D |
1.8 |
| Hormann
PG |
18888017B |
2.0 |
| EBC
- Greenstuff |
EBCG21059 |
1.2, 1.4, 1.6, 1.9D(75) |
| EBC
- Greenstuff |
EBCG21060 |
1.8, 1.9TD(100) |
| EBC
- Greenstuff |
EBCG21061 |
2.0 |
| OMP |
TFE/LA4155S |
2.0 |
| OMP |
TFE/FZ4077S |
1.8, TD |
| OMP |
TFE/FZ4078S |
1.4, 1.6 |
Brake
Hoses |
| Maker |
Model |
Bravo |
| OMP |
TF1/FI53/20V |
2.0 |
| OMP |
TF1/FI53 |
1.2, 1.4, 1.6, 1.8 |
| Hormann |
18182020 |
Check |
|
|
| Maker |
Model |
Bravo |
| Postert |
Interior Kit FA3100009 |
All |
| Novitec |
Bravo Floor Mats 696BI |
All |
| OMP |
Steering Wheel Hub OD/1960FI25 |
All |
|
|
Cat=Catalytic
Convertor
C=Centre Box
RB=Rear Box
Man= Manifold
|
|
Direct
Air Induction Kit |
| Maker |
Model |
Bravo |
|
Various |
All
models |
| K&N |
KF13 |
1.4 |
| K&N |
KF15 (R, Y or B) |
1.6, 1.8 |
| K&N |
KF14 (R, Y or B) |
2.0 |
| Pipercross |
PK210B |
1.4 |
| Pipercross |
PK164B |
2.0 |
| Pipercross |
PK164C (silicone) |
2.0 |
| Green |
B/R/A/G P64T |
1.6 |
| Green |
B/R/A/G P123T |
2.0 (147) |
| Green |
P394 (Single Cone) |
1.2 |
| Green |
P124 (Single Cone) |
1.4 |
| Green |
P64 (Single Cone) |
1.6 |
| Green |
P64BC (Bi Cone) |
1.6 |
| Green |
P123BC (Bi Cone) |
2.0 |
|
| Maker |
Model |
Bravo |
| F.S.E. |
FSEVK384EC03H |
1.6, 1.8, 2.0 |
|
| Make |
Model |
Bravo |
| Novitec |
122AM |
1.8 mk1 only |
|
Section
2 - Hints, Tips, Do's and Dont's |
| Grill
Meshing
My thanks to Si Thompson for this
Looks so good I might even do mine! |
Before you start try and make sure you can find
a bit of mesh large enough, the width of the gap
to be meshed in the HGT front bumper is 1.2 metres
and most of the mesh you can buy is only 1 meter
wide. Just make sure you measure your bumper
and the piece of mesh before you buy.
To mesh the bumper you need to take it off.
There are about 8 bolts under the front bumper,
2 on each side of the inner wings (you need to
jack the car up and take off the wheels and arch
lining to get at these), 2 bolts under the bonnet,
2 clips under the headlights and you'll also need
to remove the fog lights and, if you have them,
be careful with the headlamp washers as the hose
breaks very easily and you'll end up with screen
washer fluid all over the drive/street!
The bumper doesn't come apart in two so to cut
out the original black plastic grill you need
to use a jigsaw or similar. Once this is
out sand down the parts of the bumper where the
grill has been cut out with some wet and dry paper.
Clean it and then repaint the bumper using a spray
can from Halfords.
Trim the mesh to the right size and fix into the
bumper. To do mine I drilled through the
bottom of the bumper and through the top lip of
the mouth you've just meshed and used cable ties
to hold it all in place. Alternatively you
might want to use something like Tiger Seal to
hold it in place.
In all took me a day and a bit to do. |
| De-Badging |
The
badges are just glued.
Just done this myself! Boil a kettle of water
and nick a plastic spatula out the kitchen. Pour
boiling water over the badge while sliding the
spatula behind it. Keep pouring and within 15
seconds its off. Keep pouring the water over the
sticky bits left and they will also come off.
The whole job took me no more than 5 minutes,
including the daring spatula run!
WARNING
If your car has been in an accident and the badges
are not original take extra care with this task
as the repair shop may have used a different glue
and/or the paint may not be as well adhered and
you could tear the paint off. |
| Rear
Spoiler |
HGT/
HLX Rear Spoiler
The Fiat rear spoiler is fixed through holes in
the rear screen. If you are going to fix one to
your car, you need the rear screen from the donor
vehicle or a very brave glass cutter. |
| Shortening
The Gear Stick and Changing The Knob |
Removing
The Gear Knob
Remove the old gear knob by pulling it off the
spline (this is only glued on but might need a
good tug). cover the mechanism at the bottom of
the gear stick as its a bad idea to get swarf
in there, then get someone to hold the stick in
place while you hacksaw the end off the gearstick
DO NOT HACKSAW IF LIFT UP REVERSE as this could
damage the lift up mechanism. If its a lift up
reverse u may need to hacksaw at the old gaerknob
(not stick) to remove it. Fit the new gear knob
as it says on the box, most have 3 small allen
screws that need tightening. |
| Swapping
to Marea Lights
Thanks to Joske for this update and Riclemus for
the original.
|
Simple
Change
(to
remove the glass from the lights to colour code
plase click here - cheers Danny)
Fiat
Marea Poly Elliptical Headlight Conversion (UPDATED
23/02/07) - Cheers Joske
For
Svens pdf guide click here
|
| Nitrous
Oxide |
NOS
- An Explanation
Q. How Does Nitrous Oxide Work?
There are three points. First, nitrous oxide is
comprised of 2 parts nitrogen and one part oxygen
(36% oxygen by weight). When the nitrous oxide
is heated to approximately 572 degrees F (on compression
stroke), it breaks down and release extra oxygen,
However, it is not this oxygen alone which creates
additional power, but the ability of this oxygen
to burn more fuel. By burning more fuel, higher
cylinder pressures are created and this is where
most of the additional power is realized. Secondly,
as pressurized nitrous oxide is injected into
the intake manifold, it changes from a liquid
to a gas (boils). This boiling affect reduces
the temperature of the nitrous to a minus 127
Degrees F. This "cooling affect" in
turn significantly reduces intake charge temperatures
by approximately 60-75 Degrees F. This also helps
create additional power. A general rule of thumb:
For every 10 Degrees F. reduction in intake charge
temperature, a 1% increase in power will be realized.
Example: A 350 HP engine with an intake temperature
drop of 70 Degrees F, would gain approximately
25 HP on the cooling affect alone. The third point,
the nitrogen that was also released during the
compression stroke performs an important role.
Nitrogen acts to "buff or dampen" the
increased cylinder pressures leading to a controlled
combustion process
Regarding how flammable NoS is, NoS is not flammable.
Once the NoS is heated (see above) it breaks down
and releases oxygen, assuming enough fuel, the
fire will get more fierce. That's how NoS increases
performance in the first place. Again the following
should clear up any questions:
Q: Is nitrous oxide flammable?
A: No. Nitrous oxide by itself is non-flammable.
However, the oxygen present in nitrous oxide causes
combustion of fuel to take place more rapidly |
| Door
Handle Replacement |
Marea
Handles
Firstly is Joske's guide onhowto spray and remove the ridgefrom your new Marea Handles. Click here for pdf guide.
Secondly
is Joske's fitting guide. This is the way to do it without
cutting any excess from the handles with a hacksaw.
Click here
for pdf guide.
Alternative
version below
The
picture is of a Passenger door handle (pictured
upside down!). You will need to use a hacksaw
with a metal blade to remove the metal section
in the red box as it's too long to fit into the
bravo front doors. In the instruction below
I'm going to assume that you've already removed
this piece.
1.First of all, remove the door card, see the
fix-a-bravo pages
2.Then pull back enough of the inner door plastic
lining sheet to allow you access to the back of
the handle.
3.There's a nut holding on the front of the handle
(circled as 'C' in the picture). Remove
this.
4.Then use a torx head screw driver to remove
the screw in the side of the door that screws
into the metal bar that is circled in the diagram.
Note the Bravo front door handle has a slightly
different shaped section to the picture Marea
Handle.
5.The handle will now be loose. It will
remain clipped in with the clips circled in yellow
on the picture. Adjust the handle until
you can withdraw the handle by a couple of inches.
6.The handle will still remain attached by two
metal arms. One of which is pictured in
the picture as 'A', the second is where the line
'B' points to. This second metal arm is
for the locking mechanism, but as I used rear
door handles they don't have/need this part.
7.You need to be very careful and unclip the two
metal arms from the back of the handle.
DO NOT snap them and try not to break the little
white clips they clip in with as you'll need one
of these.
8.Note that the included picture is upside down
and the metal arm 'A' will be at the top of the
handle. This metal arm 'A' needs to be removed
from the new handle and the equilivent arm that
you've just removed from the original handle needs
to be fitted here instead.
9.The second metal arm 'B' will now be redundant.
DO NOT just snap it off! The door won't close
without it! Wrap it in something soft (I
used some spongy subwoofer gasket tape; though
I guess you could use cotton wool!). The
bar needs to hang loose, DO NOT stick it to the
side of the door as it needs to move when you
open/close the door. Hence the reason for
wrapping it in something soft (you don't want
it to rattle around).
10.With this done your now ready to re-fit the
handle. Make sure you get the clips in (circled
in yellow in the picture) on both the top and
underside of the handle.
11.Then re-fit the nut on the circled thread 'C'.
12.Re-attach the door lining (I used some spray
adhesive) and re-fit the interior door card.
13.Congratulations, sit back admire your work
and have a beer!

Alfa
147 Handles Thanks
to Ben Brown
Removal
of Fiat Handle
-
Remove door card. Won't go into details here-
Just undo everything, using allen keys and
a philips screwdriver.
-
Use a torx tool (size 30) to undo the bolt
on the side of the door, loosening one end
of the handle.
-
Use a 10mm socket to undo the other end of
the handle (inside the door cavity)
-
Push the handle forwards (ie towards the front
of the car), then pull upwards firmly and
eventually the handle should come loose.
-
There are 2 rods- one that pulls the door
opener, one that locks/unlocks the door. Pull
off the 2 rods from the handle. You'll need
the little white bits on the ends too.
Leave the rod that pulls the door opener attached
to the car.
Make a note of exactly where the kinks are
in the locking-rod before removing this from
both the door and the handle, so you can put
it back in the right way up. You don't want
to put this one back on upside-down or backwards,
or you'll find it'll lock but not unlock!
With a little wiggling the old handle is now
free.
-
Pull the spring clip out that holds the lock
barrel into the fiat handle. Then put your
key in and use it to pull the lock barrel
out of the handle. (Don't just try and prise
it out cos you'll pull the metal top off the
lock mechanism and have to spend ages reassembling
that little flap- not that I did this of course!)
-
The lock barrel fits into the Alfa handle
no problems. There's another spring clip holding
this in.
-
There's a big chunky bit on the alfa handle's
mechanism that isn't there on the fiat's:

Take
a hacksaw to it to make it slimmer like this:

I also cut off the section shaded here, as it
was knocking against the window runner inside
the door, and not closing fully when you released
the handle
Be really careful with the plastic lever on
the back of the lock. If it breaks you'll have
a working handle, but no working lock on that
side of your car.
Refitting
Refitting the handle is really just a reverse
of the dismantling. Reattaching the rods is
easier if the little white bits are in the holes
1st, not on the rods.
Offer the handle up to the door and attach the
opener rod(still attached inside the door) to
the handle, then with the locking rod (unattached
from the car), reach it inside the door and
attach it to the handle 1st, feed the handle's
bulky bits inside the door, then, looking through
the gap in the door, (possibly getting someone
to hold a light inside so you can see what you're
doing), attach the door end of the locking rod.
This seems complicated, but the locking rod
is the most fiddly part of the whole job, and
this way I found the quickest.
Removing the window runner may help too, to
give you more room to work (only 2 10mm bolts).
To get the handles back in, you can hook the
top edge in place, and tap the handle upwards
gently from below with a screwdriver resting
on the lower lip, just enough to get the lip
to slip into the door fully.
Any questions I could help with, email me ben_brown123@yahoo.com
|
| Fibreglass
Parcel Shelf
A brilliant write up by Alan |
Fibreglass Parcel Shelf
The first step is to get your stuff, you will
need (I feel like I'm writing a cook book):
A couple of meters of lose woven material
About 1.5litres of resin, but I'd get 2ltrs to
be sure!
A bottle of catalyst
A load of cheap brushes, about 2"
A load of rubber gloves - try the petrol station!
A little tub to mix it in (like those you get
the microwave deserts in - mmmm)
A little syringe to measure out the catalyst
A set of kitchen scales to weigh out the resin
A couple of bin bags
A roll of that wide tinfoil
A dust mask
I ended up getting all the fibreglass stuff from
a model shop, not the cheapest! Try a boat shop
or body shop, they should help.
What to do:
Take the ropes etc off your old shelf so it just
leaves the shelf itself. Put your old shelf in
a couple of bin bags so it won't get messy. Try
smooth the wrinkles out as much as you can, use
a bit of tape to hold them flat, but not too tight
else you will lose the shape of the shelf. Next
cover the top of the shelf in tin foil, this needs
to be smooth as any wrinkle will get stuck in
the fibreglass, not that this matters too much
I guess! Smooth it down to get the shape and tuck
it under the edges. This will make it really easy
to get the old shelf out again.
Next lay your fibreglass matting over the shelf.
Leave plenty hanging over, it can be cut off later.
Now comes the fun part. Mix your resin, it's normally
about 100g resin to 2ml catalyst, but read the
tin to be sure. I wouldn't mix more than 200g
at a time as you won't be able to use it in time!
Also don't put more catalyst in than recommended
as this causes the reaction to happen at a much
higher temperature and weakens the structure.
Once mixed use the brush to paint the resin over
the matting. Work round the dip in the shelf first,
pushing the matting down, then round the edges
and finally fill in the middle. Don't worry if
the fibres move out of place a bit when you do
this, it'll be rite! Mix more resin and get new
brushes and gloves as necessary!
You should eventually end up with something like
this:

When the resin has set get a black marker and
roughly draw round the outline of the old shelf
so that it can be cut to shape. You should then
be able to get the old shelf from the underside
of the new one, be careful as it will be a bit
flexible. Cut off the bulk of the excess material,
you should be able to do this with scissors. It
should look like this:

The bits of tin foil on mine are where I used
two thin rolls instead of one thick one. The join
got stuck! Thus I say get one of those wide rolls.
If you are making this shelf for speakers etc
cut a bit of ¾" MDF to sit inside the
shelf. Then cut a load of strips of matting about
2" wide and 6" long. Lay the MDF in
the shelf and use the strips of matting and resin
to stick the board down. Use the brush to push
the matting into the corners and get the fibres
where you want them. I also put a piece of 1.5"
square along the back edge incase I decided to
put pins I to allow it to lift. Put more strips
of matting around the edges on the inside to strengthen
the shelf. Keep going until you think it's stiff
enough. A pic at this stage:

Now comes the really nasty part; once you are
happy with the shelf you have to cut it to shape.
Cover all your skin doing this and wear a mask,
I didn't and I rashes all over my arms for a couple
of weeks, and it itched like hell! I uses a dremel
multi with a small circular saw blade to cut around
the edges then a sanding wheel to finish it off,
but for those who don't have such lazy man's tools
try wrapping masking tape around one end of a
hack saw blade and using that. For sanding I'm
afraid it's down to the good old wet'n'dry! Give
the sides a bit of a rub too just to make them
nice and straight.
It's now time to try it in the car, I recommend
getting a cloth and bucket and wiping all the
dust off first or you'll get in a real mess! Keep
tweaking it with the sandpaper until it drops
in neatly to the plastic supports in the boot.
Check that the boot will shut too, to get this
right I'm afraid it's just trial and error, but
patients will pay off! If you want the shelf to
lift mark and drill for pins and lifting cords
now. I would use a bit of stainless for the pins
and drill them at least 50mm into the shelf. For
the strings I would drill a hole straight through
the shelf, route a small notch in the underside
and then just tie a bit of the stainless or similar
to the end of the string (or just forget the routing
bit! Lol). For the upper end I would just put
an archery type loop. I will try explain how to
do this at the end for those who do not know.
Next simply cut the holes for your speakers and
do a dry run mounting everything, make sure it
fits on the shelf and in the car! Then take it
all off again and you'll have something like this:

Next comes about the most difficult bit, carpeting
it! After going to Motor World and seeing their
extortionate prices for carpet (£26 for about
85cm x 1.5m!) a had a little look round the internet.
The best price I found was good old Waxacar at
under £6 for the same stuff! Have a look
on ebay, they always seem to have plenty, I went
for the grey to make it look inconspicuous but
go for whatever colour you fancy. You will need
one roll. To stick it down I used B&Q's own
brand of clear evo stick, basically because it's
cheaper! Which is important seeing as I probably
used half a dozen tubes! To get a good finish
I would try working around the shelf in stages.
Start by putting plenty of glue on the raised
section and laying the carpet on. Don't put the
glue too thick else it will show through the carpet.
Have some heavy but clean things (tins of beans
etc) to hand to stand on the carpet as the glue
goes off. Put them on a sheet of paper or something
to stop the tins marking the carpet. Then work
down the shelf doing the same thing until you
get to the speakers. Put glue all around the speaker
cut outs then stretch the carpet all the way over
the edge and clip it with pegs or similar. Once
you've gone front to back go all the way round
the edge leaving the corners until last. Cut as
much material away from the corners as you can
then try do a neat fold. You should be able to
tuck them under.
Then just fit your speakers and your away, give
it a go, I managed it!

|
Spraying
Bump Strips
by Ben B |
FIRST
mask everything off. I recommend leaving the strips
on the car, as when they've been taken off you
really can't get them back on again as they used
to be!
On
the side strips I used the tape stick-side out
and got it down the join of the bumpstrip, to
make sure it stuck to the strip not the car and
no runs could ever get onto the car's paintwork.
Then mask off a big area with newspaper (overspray
really can get anywhere, so do as much as you
can!)
Obviously
with the bumpers, just mask normally. Ideally
of course you'd want to get the whole bumper resprayed
professionally to get the best finish, but try
your best to mask it to the deepest part of the
crevice, as you WILL always see the edge of the
new painted area when you look really closely
(not that when it's been on for more than a day
you'll ever look that closely ever again!)
Nnext
give all the bumpstrips a good rub down with some
fine wet n dry. Even though they are already nice
and smooth, it's important to do this to get them
clean, as any 'back to black' stuff that has been
used it the past, or anything else, will stop
the paint from adhering properly, and it'll start
to flake one day soon.
Use PLASTIC PRIMER. Very important. Normal primer
will just react and go all funny. A few coats,
with a light rubdown in between.
Use paint that HAS BEEN MIXED FOR YOU, even if
your colour is on the shelf. The spray pattern
is much better. The off the shelf can's have a
tiny round spray pattern, the mixed-up ones have
a nice wide fan spray. Usual spray technique applies.
Even speed and distance, and if you get a run
DO NOT TRY AND HELP IT, WIPE IT UP, etc !!! You'll
have to leave it a day or two and rub it back.
Try and avoid runs altogether by not getting impatient!
It's always that 'one more will do it' touch of
the spraycan that results in the runs! Give it
a nice steady pass with the spray and leave it
at that for half an hour or so before the next
coat!!
Laquer is a funny one- it usually ruins any finish
I've managed to get!! I found a motorspares brand
can gave me a better finish that a Halfords one.
They're all pretty poor, mainly again because
of the spray pattern. Just try your best to give
it an even finish without runs.
Try
and remove the masking without it pulling your
paint off with it!
Hope
this helps! Let me know if I need to clarify anything.
 |
Fitting
Bonnet Lifters
by
Insy |
Thanks
Insy for this write up. Taken from his own personal
site at http://www.insworld.co.uk
|
|
|
|
.")
|
|
|
|
The goody box from Germany! Instructions are useless as they are in German (although picture does give you a good clue).
|
|
|
|
|
|
|
|
|

|
|
|
|
Prop the bonnet up with the usual bonnet support strut and start working on the DRIVER SIDE FIRST. Unscrew the bolt on the wing as shown above.
|
|
|
|
|
|
|
|
|
|
.")
|
|
|
|
Replace with washer and chrome ball bolt (its a bolt with a ball like shape on top).
|
|
|
|
|
|
|
|
|

|
|
|
|
Unscrew bonnet bolt as shown above.
|
|
|
|
|
|
|
|
|
|

|
|
|
|
Replace with washer and ball bolt.
|
|
|
|
|
|
|
|
|
. You may have to push")
|
|
|
|
Push bonnet lifter onto both ball bolts (twisting the strut movement bar if necessary but make sure either end does not unscrew). You may have to push |
|
|
|
|
|
|
|
|
|

|
|
|
|
Ensure bottom end of bonnet lifter is firmly over the ball bolt as shown above.
|
|
|
|
|
|
|
|
|

|
|
|
|
Slide metal clip through tiny holes in each end of the bonnet lifter and secure into position. This stops the lifter from popping out.
|
|
|
|
|
|
|
|
|
|
|
|
Having
fitted the driver's side lifter first, it should
be easier installing the passenger side (as you
have to lift the bonnet higher than the fixed
bonnet support strut can go to fit the lifters)
- the drivers side lifter helps you keep the bonnet
up whilst you install the passenger side (although
be aware it cannot hold the entire weight of the
bonnet by iteself).
Repeat process on passenger side.
Job's done! Marvel at your work and test it out
:)
|
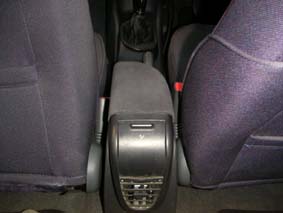
Marea
Centre Console
by
RaginHGT |
Alternative
pdf version here from Sven
Very detailed
Removing
the original console.
Remove
gearstick knob, gaiter, square plastic under handrake
and the rear
ashtray. Where the ashtray was, pull on the plastic
so it pops out. Remove
the 2 plastic's under the dash, they have a screw
and 2 plugs in each side.
Unscrew the rest, 2 screws at the back, 1 under
the handbrake and 1 in the
pot just under the front ashtray. Try to prize
the unit out, i decided to
cut the plastic under the handbrake as its going
in the bin anyway. Now this could be a good time
to hoover in those hard to get area's.
Fitting
marea console.
When
trial fitting you will notice that the marea unit
is fastened down
differently at the back so make a bracket of some
sort like this 1.
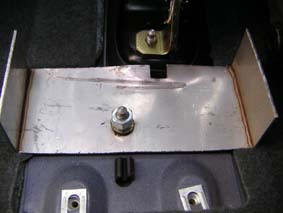
Make
a hole for the stud that is showing using an 8mm
drill bit then fix
down with a lock nut. When the unit is in place
use a 3mm drill bit to make
pilot holes in sides then use self taping screws
to attach the console to
the bracket. Once you have connected everything
else back together you will
find that the plastic under the drivers side dash
does'nt fit, use the
original part as a template and trim the marea
part with a stanley knife.
For
a guide onhow to re-trim the armrest click here
(Thanks to Rob M)
|
Heated
Seat Repair
(Thanks Joske) |
A fantastic
in depth guide on how to fit new heating elements
to your seats for extra warmth on your bum for
those long winter journeys. Beware - its a large
file. Cheers Joske
Click
here for the pdf document |
Blinking
Repeaters
by
Sven |
This
is a guide on how to make the side repeaters blink
when locking and unlocking the car with a standard
Fiat RCL relay.
Click
here
for guide |
JTD
Dump Valve
by
Joske |
This
is a fantastic step by step guide on how to install
a dump valve on the JTD
Click
here for guide |
Mistjets
by
Joske |
This
is a nice step by step guide on how to install
a mist style washer jets
Click here for guide |
|
|


.")

.")


. You may have to push")


